
80’s Off The Shoulder Crop Top
By Lux
Difficulty 2 out of 5
Materials:
Girl Is Poison Sewing Pattern: Piece 1 & Piece 2
1 yd stretch fabric (cotton knit works great)
Sewing machine or serger
Scissors
Pins
Thread
1) Wash and dry fabric to preshrink.
2) Print out the pattern pieces on standard size paper (8.5X11“). Cut them out along the bold black lines. Since these may not print exactly the same on all printers you may need to extend the lines to the very edges of the paper and then cut. Your pieces should end up looking like this: photo.
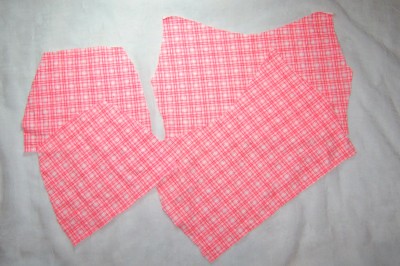
3) For S/M cut out your top pieces following the directions on the pattern and mark the symbols (stars, bolts, “flashes”). For M/L add 2” to each piece width wise. You should end up with 4 pieces: 2 sleeves, 1 back and 1 front. (photo)
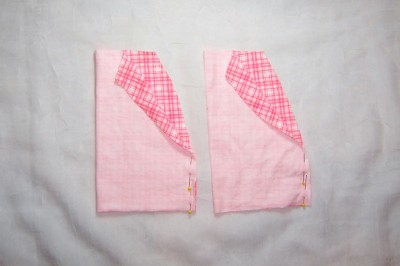
4) Take one sleeve and with the right side facing in match up the ends with the flash symbols and pin. Do the same to the other sleeve. (photo)
5) With right sides facing each other pin your front to your back matching the edges at the star symbols. (photo)
6) Sew the pieces where you have pinned them 5/8” from the edges. Sergers work great for stretchy fabrics, but if you don’t have one you can use a straight stitch. Just set it to a longer length and lower the tension a bit. Or if you prefer, you can use a zigzag stitch to prevent fraying depending on the type of fabric you are using. (photo)
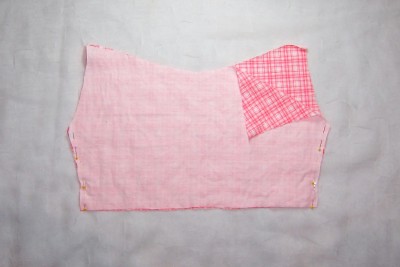
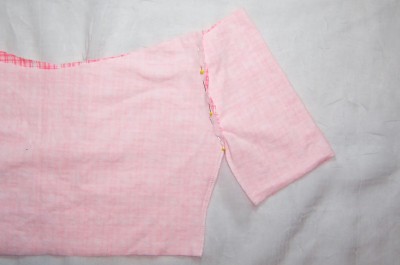
7) With right sides facing each other, pin your sleeves to your top matching the edges with the lightning bolts. Make sure your underarm seam matches up directly with your side seam. (photo)
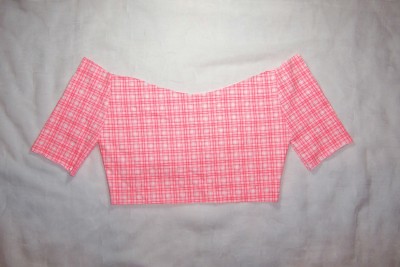
8) Sew the sleeves onto your top 5/8” from the edge. Turn your top right side out and it should look like this: photo.
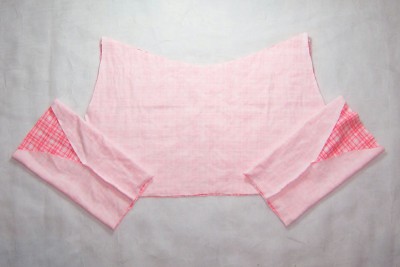
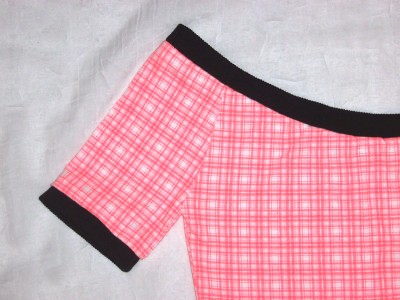
9) At this point you can finish the edges a couple of different ways. You can do a traditional hem by folding the edges over and straight stitching. You can serge the edges for a DIY look or leave them raw. OR you can band them like I did. (photo)
Adding Bands with Knit Fabric
I recommend banding. It makes the top look more polished and it’s super easy to do. To finish your edges by banding you will need to cut out long strips of the same type of fabric. You can use a contrasting color like I did, but make sure it is the same type of fabric or at least very similar.
First decide how wide you want the band, double that and add 1 ¼“. Next measure the edge you would like to band. You can do this by laying the top flat, measuring across doubling that measurement and subtracting 1“. Use these measurements to determine the size of the strips you will cut out. Do not add anything to the length for allowance, you want the band to be slightly smaller than the edge so it fits against you snugly. For example: my neckline measured 16” straight across and I wanted a 1” band so I cut out a piece measuring 3 ¼” by 37”.
Next, with right sides together, sew the two ends of the band together 5/8” from the edge. Turn it right side out, fold it in half lengthwise and iron it flat. Pin the band to your top matching the raw edges. Sew the band to your top. Since the band is slightly smaller you will have to stretch it a bit as you sew. Don’t stretch too much though or you’ll get an uneven look.
Repeat these steps for each edge and there you have it. Your 80’s off the shoulder top is done. Now you can break out your bicycle shorts and layer your top over a sports bra. Don’t forget the sweatband! :)
Tips:
~As with any pattern you may have to alter it to fit your body the way you like. One way to do this is by adding darts in certain places.
~You can also cut one or both of the pattern pieces smaller or bigger.
Variations:
~You can make a mini dress by lengthening the Front/Back piece by a few feet.
~Or make a long sleeved top by lengthening the Sleeve piece.
~You can add interest to your top by cutting the sleeves in different fabric.

2 comments:
Hey!
Thats a very nice instruction! I just followed it, and here is the result:
http://2.bp.blogspot.com/-gtl0jRInvwI/Tg3qf8IlRkI/AAAAAAAAAAU/DHKI1v6ixe4/s1600/Geb+Geschenke.jpg
I didn't understand everything, but I think thats because of my english which isn't that perfect...Thank you!
LG, Amitola
That's a really nice information on how to stitch off the shoulder crop top. For already stitched Cotton Crop Top, check out the collection here!
Post a Comment